Category Archives: Feminine Cards

My Time Made Easy April Release

Standard

Hi everyone!  Today is April 1st which means the new products from My Time Made Easy are available in the store for purchase!  I showcased the super cool running shoe template the other day and today I am sharing the lovely Sexy Soles Template and Shop Till You Drop digital stamp set.  Take a look…

Sexy SolesAnother adorable shoe template!  The perfect gift for the bride-to-be, birthday gal or shoe fetishist.  Here I filled it with chocolate coins and paired it with a cute card and some gift cards.  We all need a little retail therapy now and again!Sexy SolesI was going for that nude patent leather look, which is really popular right now, so I printed the colour onto glossy photo paper and then used that to cut out my template.  The cheetah paper is from the new Purse Patterns digital paper pack.  If you like animal prints this set is for you!Sexy SolesPlease take a few moments to check out what the other talented ladies of the design team have created and give a warm welcome to our 3 newest members.  Also, our Inspiration Gallery is chock full of great projects so grab a cup and do some surfing!  Have a fabulous day!

~Tracy

4 My Friend

Standard

Hello everyone!  It’s March madness around here this week with the kids being off school.  What to do to keep them busy (and give me a bit of crafting time!).  Today we invited some friends over and baked chocolate chip cookies so they have full tummies and are playing together nicely.  Time for a quick post.

My first of two cards is for the Out of a Hat Challenge this week.  The theme is friendship.  We all need them and I feel so blessed to have such great ones – crafty blog friends included!  Here’s to you…

4 My FriendI just received a new CTMH stamp set entitled Country-Born.  The sunflowers in the milk can came from that set and I coloured it in with alcohol ink markers.  I then cut it out and popped it up on a background cut from Buzz and Bumble paper.  4 My FriendThe side of the card is stamped with hexagons in Bamboo ink from the Honeycomb stamp set.  I ran a paper border down the edge of the hexagons and added a faux stitch with a brown maker.  No honeycomb is complete without a bumblebee, so I added my favourite bee stamp from the Jardin stamp set.  To finish it off I added the sentiment flag in the bottom corner.

My second card is for last week’s Heart2Heart challenge.  The theme was spring so I thought rays of sunshine for this one.Sun is ShiningI used the burlap pennant from Patterned Pennants for the sun’s rays.  The sun and air balloons were cut out with the Artiste cartridge and stamped with images from the April stamp of the month – My Sunshine.  I stamped the large air balloon in several different colours cut out the strips and popped them up for dimension.

Rays of SunshineHope you’re having a great week.  Thanks for stopping by and taking a peek!  See you back here again real soon and until then happy crafting!

~Tracy


Matchbox Makeover and CAS Cards

Standard

Hello out there!  It’s almost March and it looks like we are getting some wet, snowy weather to bring it in.  But that’s ok – in like a lion, out like a lamb as the saying goes!  Today I have a couple of things to share.  The first one is my matchbox makeover for the Out of a Hat Challenge this week.Under the SeaI don’t own any matchboxes and I haven’t even seen any around for years.  I’m sure they’re out there but I haven’t had reason to look.  None-the-less, boxes are not that hard to make so I made my own matchbox.  I was inspired by Sandra’s little mouse house and came up with this ‘under the sea’ theme.  I also thought it would be fun to have a window in the box, as if you were looking into an aquarium.Mermaid & FriendsThe paper is from a K&Company paper stack I bought on sale last summer.  Perfect for my aquarium.  There is no stamping on this project – just a lot of finicky cutting!

My next project consists of a couple of CAS cards I made for the Heart2Heart Challenge Blog.  I have always loved CAS cards.  They say so much in the simplest way.  The first card uses the Pinwheel stamp set which will be available through Close To My Heart in May. PinwheelNot much to say here other than the ink colours are Twilight, Outdoor Denim, Pear, Blush and black.

My second card uses the CTMH March stamp of the month:  Floral Happiness.  I used pigment inks on this card so that the flowers would be a bit more vibrant against the kraft background.Happiness is...That’s it from me.  I’ll be back tomorrow with details to a My Time Made Easy giveaway so come on back for your chance to win.  Have a lovely day and happy crafting!

~Tracy

My Time Made Easy Pretty Palette Challenge #82

Standard

Hello all you folks in blogland.  It’s Thursday and you know what that means – time for the My Time Made Easy Pretty Palette Challenge.  Sadly, this will be the last one, as MTME has decided to stop hosting challenges and put more effort into presenting their fabulous new releases each month.  So I just want to say thanks to Lauren and her awesome team for having me aboard.  It’s been a real pleasure to work with this extremely talented group and I will remain a big fan.  OK, here goes one last time… the challenge colours are saffron, pink, rose and pear.MTMEPPC82

I started out with paper from the Grammy’s Pretty Patterns digital paper pack and matted it with a rose coloured card stock.  This is such a lovely, classic paper pack and I’ve used it time and again. So ThoughtfulMy focal image flower and butterfly are from the Bold Botanicals digital stamp set.  I printed the flower twice and coloured both copies with Copic markers.  I then cut them out and popped up some of the leaves up to give the flower a bit of dimension.You're So Thoughtful  A pink ribbon and a few rhinestones finish it off.  Hope you are able to join us for our last Pretty Palette challenge.  You don’t have to use MTME products – just the challenge colours on whatever project you like.  Then be sure to upload your picture to the MTME blog post.  Real easy!

Have a fantastic day and I’ll see you real soon.  Thanks for stopping by!

~Tracy

Close To My Heart Blog Hop

Standard

Hi everyone!  I’m really excited to be a part of a small CTMH blog hop which was put together by a few local (Ottawa area) consultants, to show off some new stash from the Spring/Summer 2013 Catalogue.  I will be showcasing the For Always papers and textiles, which will be available February 1st.

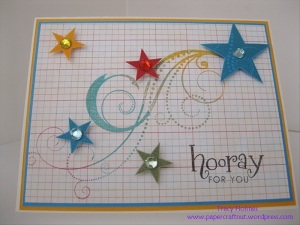
First up is a simple card.  I layered four strips of the B&T duos papers with 3 strips of the coordinating card stock, which all come in the For Always Paper Packet (pg 32).  The edges of the coloured card stock were scalloped using the corner rounder punch (pg 132).Happiness is...
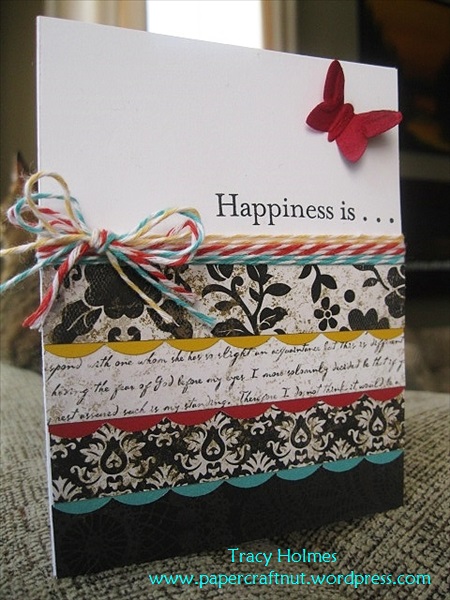
A band of baker’s twine (pg 121) in Lagoon, Cranberry and Crème Brulée was added to the top of the patterned paper.  I thought this was a bit more fun than a strip of ribbon.  The sentiment is from the March Stamp of the Month: Floral Happiness (pg 140).  This is a gorgeous set but you’ll have to wait until March to get yours!

Next, I decided to decorate a few plain candles I had laying around.  These will go in my powder room to jazz it up a bit.Decorative Candles
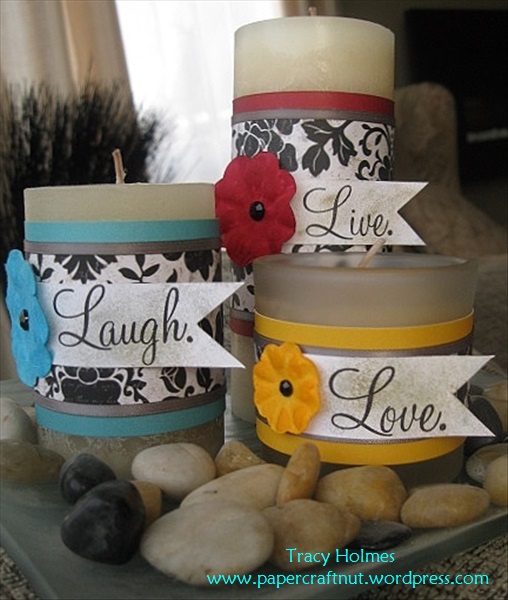
Aren’t these fun?  I just wrapped strips of paper around each candle and then added some of the grey ribbon from the For Always Cardmaking Kit (pg 37).  I coloured the paper flowers with alcohol ink markers to match the card stock and added a Licorice Opaque Adhesive Gem (pg 120) to each centre.  The flags are sponged with Desert Sand and Whisper inks and then stamped with the sentiment from the Love Life stamp set – one of my all-time faves!

Last but not least is a canvas wall hanging I thought would be lovely in a baby’s room.Love Makes the World Go Round
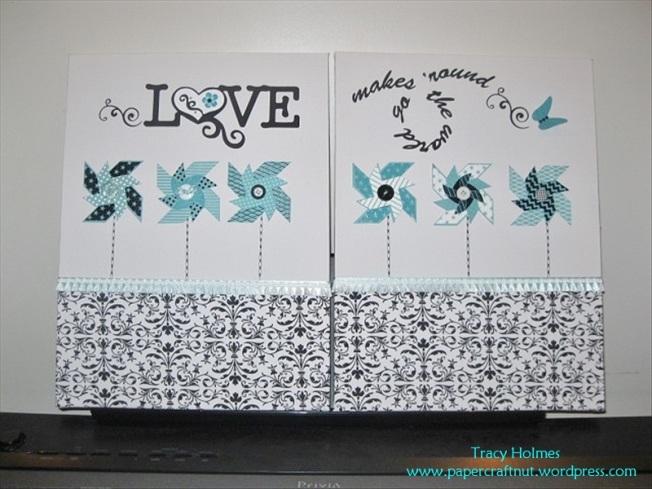
I’ve used some of the fabric from the For Always textiles collection (pg 117) on the bottom of each canvas.  The pinwheels were cut out using the Cricut Artiste cartridge and heat embossed to add pattern and texture.  These canvases were inspired by the May Stamp of the Month:  Pinwheel (pg 142).

So that’s it from me.  I hope you’ve enjoyed my projects and are inspired to check out the new Close To My Heart Catalogue.  Remember you can start ordering from it on February 1st!

Please check out what the other lovely ladies have made by clicking on the links below.  Have a great week everyone and happy crafting!

~Tracy

Heather Hunt www.creativecoconut08.blogspot.com

Tracy Holmes www.papercraftnut.wordpress.com <you’re here!

Tracey Geneau http://traceyctmh.blogspot.ca

Laurie Wood www.laurieslovingmemories.blogspot.com

 Diana Saunders www.farmerdistamps.blogspot.com

Sweet As Honey

Standard

Happy Friday to you!  I have a really cool card to share with you today for the Heart2Heart Challenge happening this week.  They are looking for projects/cards with folds.  After searching different styles of cards on the web, I found one called a book box card.  LOVE IT!Book Box CardThis card looks like a shadow box, but the front cover opens like a card.  The tutorial I found online used an embossed acetate window on the front cover, so I did the same (you know I love acetate!).  But you could just as easily make a regular card front so the inside is a surprise for the recipient.Book Box CardPaper from the new CTMH Buzz & Bumble paper pack was used on this card.  The branches and beehive were cut using the Art Philosophy and Artiste Cricut Cartridges.  To get the rounded lines on the beehive, Cocoa ink was sponged on using a piece of circular cardstock as a mask.  I then used a dotty hexagon stamp from the new Honeycomb stamp set to add a subtle dotted pattern in Crème Brulée ink.  My bumblebee is from the Jardin stamp set.Beehive CloseupI think the flowers on this card were the only non-CTMH products.  I had the little orange premade blossoms in my stash, so I used those on the tree branches.Sweet As HoneyFor a complete set of instructions on how to make a book box card click here.  The instructions are really clear and there are lots of photos.  Have a great weekend everyone and hopefully you’ll have some time to try a book box card of your own.

Happy crafting!

~Tracy

CTMH Supplies:
Cardstock:  Colonial White, Crème Brulée, Cocoa, Olive
Buzz and Bumble B&T Duos Paper
Cocoa Ink, Crème Brulée Ink
Sponge dauber
Artiste Cricut Cartridge
Art Philosophy Cricut Cartridge
Accessories: Burlap Ribbon, Color-Ready Kraft Borders, Hook & Loop Dots, 3D Tape
Stamps: Honeycomb, Jardin


Shooting Stars

Standard

Hello there!  Glad you could stop by and take a peek at a couple of cards I made this weekend.  The first one I will enter into the Out of a Hat Challenge and showcases one of my favourite go-to stamp sets – Close To My Heart’s Love Life.Hooray For YouI have used this set on many projects.  It has some fabulous shapes and swirls that are great for a variety of projects.  Here, I wanted to utilize the big swirl and stars, so I went for a simple card that could be used for a birthday or to congratulate someone. Shooting star

The colours were pulled from the background paper that I received in a prize pack from Vivian over at ContadinaK (thanks Vivian!).  If you have a few moments go check out her blog.  It’s chock full of beautiful handcrafted projects.  And she does video tutorials too!Thanks A BunchMy second card uses a water colour background, which I’ve been wanting to do for quite a while.  After brushing on the water colours (green, blue, purple) and letting them dry, I stamped the flowers on with Momento Tuxedo Black ink and coloured them in with Copic markers.Thanks a bunch

This card is really pretty in person.  One of the many things on my paper crafting to-do list is to learn how to take better photos.  So many things to learn!

Hope you are having an excellent weekend.  Here’s to a great week.  Talk at you soon!

~Tracy


Shimmery Roses on Acetate

Standard

Happy humpday!  I’ve been messing around in my craft cave with acetate again.  This time I’ve used clear cards and one of the rose images from the Close To My Heart Happy Valentine’s Stamp of the Month Set.  This really is a gorgeous stamp set, and if you spend $50 on Close To My Heart products this month, you can get this set for $5!  A great deal.  Check out my CTMH Specials page for more details.Image

The whole process started off with me heat embossing the roses onto a piece of acetate.  Originally, I tried to do this right onto the clear card, but ended up melting it (dorky crafter mistake #1).  I also discovered, after the fact, that there is a protective plastic layer on each side of the clear card that needs to be peeled off before using (dorky crafter mistake #2).  I’ve used these clear cards before and wondered why they looked so cloudy.  Now I know, LOL!  Maybe the protective film contributed to the melting!Rose CloseupI wanted to add colour and sparkle to the roses, so I spread glue onto the roses with my glue pen, and then sprinkled them with Prisma Glitter.  This worked ok, but when I tried colouring the glitter with Copics – not so good!  After a few moments of contemplation, I decided to use my Color-Ready Pearl Paint, red reinker and green distress stain to colour them.  LOVE the results!RosesI added a drop of red reinker to a glop of pearl paint and mixed it up.  After painting in the roses, I went back in with straight reinker to add contrast.  Once that was finished, the same technique was used on the leaves using green distress stain and pearl paint.  This would have looked great without the Prisma Glitter, but the glitter adds a lovely shimmer.  The roses were cut out and stuck to the front of the card (paint and embossed side down) with glue dots.Thank YouThe inside of the card holds a piece of Colonial White card stock, which I stamped.  It was then run through the Cuttlebug with the Thanks embossing folder and adhered to the inside of the card with glue dots.  The roses were positioned on the front of the card to hide the Thank You sentiment inside.

I’m really happy with the way this turned out.  There is a snow themed challenge over at the Heart2Heart blog this week and  I may just have to try a snowflake card using this technique.  We’ll see what happens!  Have a fabulous evening and I’ll see you back here tomorrow for My Time Made Easy’s Pretty Palette Challenge #79.  Happy crafting!

Love @ Home

Standard

Happy New Year everyone!  Best wishes for a happy, healthy and crafty 2013.  I took a bit of a crafting break over the Christmas holidays and am now anxious and excited to get back at it.  So I visited the ladies over at Out of a Hat Challenge Blog for some inspiration and decided to make a card for this week’s challenge.  The theme is birthstone colours.  My birthday is in June so I went with the pearl.Love At HomeI chose the sentiment from the Close To My Heart Home Sweet Home stamp set.  This inspired me to use roses (a symbol of love and beauty) on the bottom of the card.Pearl RosesUsing the CTMH Floral Happiness stamp set, I stamped the first rose layer in Baby Pink ink and then brushed some Create-A-Shade Pearl Paint over top.  Once it was dry, I stamped the rose overlay on top in Blush ink.Love At Home

A bit of pink patterned paper, some ribbon and pearls are the finishing touches.  I gotta say I’m feeling a bit rusty so I’d better get back down in my crafting dungeon and make more stuff!  Have a great day and see you real soon!

MTME Pretty Palette Challenge #75

Standard

Hello folks.  It’s time for another My Time Made Easy Pretty Palette Challenge.  You can check out the complete rules and the DT’s fabulous projects by clicking on the link.  The challenge colours are Rust, Ivory and Eggplant.This week, I chose to make a feminine ‘Just Because’ card.  Most of us know someone who could use a little pick me up now and then, and there’s no better way to tell someone you’re thinking about them than with a homemade card or gift.Today’s card features the Pretty Pattern sketch from last week’s My Time Made Easy Challenge.  The polka dot paper is from the Fall Foliage digital paper set, and was coloured to suit this project using Gimp photo editing software.  Have I mentioned Gimp is FREE?  Anyone can download it onto their computer, so why not stretch your creative muscles and give the digital paper crafting world a try?  Download here.The very pretty Scent-sational label is from the Apothecary Labels digital stamp set.  The polka dot border was coloured using Gimp but the flowers were coloured in with Copics by yours truly.  The purple paper underneath is from the Amethyst Sparkle digital paper pack.To jazz things up a bit, I adorned the card with some ribbon and bits from my stash.  I also distressed the outside edges of the paper.  Add a bunch of flowers, picked from the garden, or maybe a scented saché for the closet or dresser, and this would make a nice gift!

Hope you are able to play along this week.  You have 2 weeks to post your entry.  Have a great day and hope you find some time to get crafty!