Water Colour Fun

Standard

Hey there!

I’ve been dabbling in water colours lately and it’s been super fun.  Seems it’s one of those activities that you can lose yourself in and forget about time passing.  Great for the soul – not so great for my kids when they’re waiting for me to make them lunch, lol!

I went to a Close To My Heart workshop/meeting a few weeks ago and during the creative session, we made three cards using the new CTMH water colour paint set.  These are fun and easy techniques anyone can do so if you want to give it a go you might want to try one of these…

HelloOn this first card, we used a doily as a stencil and dabbed different colours of paint through the holes in the doily onto water colour paper, letting the paint colours mix and mingle. Once it was dry, we stamped the ‘Hello’ and added a few black paint splatters.Love YouHere, I used an acrylic stamp block to create the pink rectangles on this card. Just paint and press. If you try this technique, make sure you use quite a bit of water to get good coverage.Hey thanksOn this card, we used a lot of water to blend and run the colours of the rainbow together. The ‘hey’ was heat embossed first before any colour was added so it would resist the paint. I outlined it with a black marker to make it stand out and then stamped the ‘thanks’.

There are so many tools you can use to create water colour artwork.  I’ve been busy watching some amazing artists on YouTube for inspiration and techniques. Wow, they make it look so easy!  So much so that I couldn’t resist trying a scene of my own using a farm stamp set I had as the starting point. I don’t consider myself much of a sketch artist so this worked great.Down on the FarmI used water based markers to colour the stamps instead of using an ink pad.  Once the images were stamped (horses, tree and barn), I went in with a paint brush and a bit of water to smudge the ink and get that water colour look. This particular stamp set is great because the images contain the outline and the shading marks. It really made it easy to add shadows and colour with paints.  When my main images were dry, I filled in the sky, meadow and flowers with paint.  For this scene, I used a combination of water based markers, water colour paint pens, paint brushes and a water colour cake palette to paint the picture. Not bad for a first try. I will definitely do this again – so much fun!

The last card I have to show you today is one I made for a close friend of mine.  Her birthday is coming up in April so I have to get this in the mail. Sweet Friend
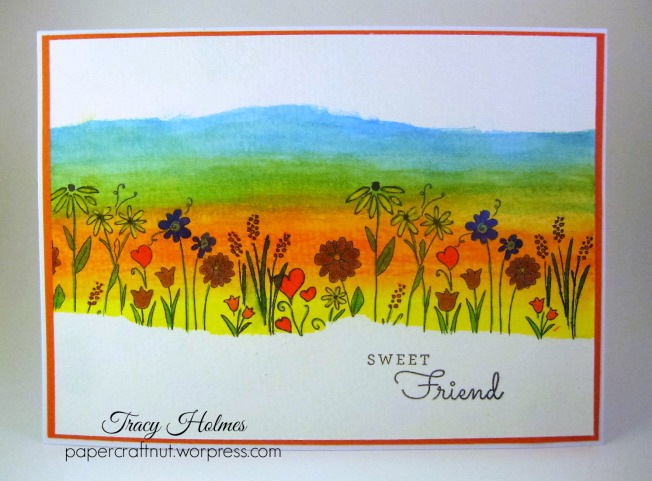
I masked the top and bottom of the water colour paper and then did a wash of colours for the background.  Once that dried, I stamped the flowers with Momento Tuxedo Black ink and then painted the flowers with water colours.

Doesn’t the last one make you long for spring? We are getting quite a bit of rain here and I’m anxious to see the last of the snow get washed away. Won’t be long before the flowers start pushing through the dirt.  Yay spring!

Hope you’re inspired to try a little water colour of your own. Until next time.

~Tracy


Springtime Wishes

Standard

Hi! I’m back with 6 cards to show you today.  I wanted to see what I could come up with using just one stamp set and one paper pack so here’s what happened. So much fun! 🙂

Triple Thanks

The paper pack I used is the new CTMH Charlotte paper pack and I paired it with the Springtime Wishes stamp set – kind of appropriate for this time of year! Groundhog day is just around the corner so maybe we’ll get lucky and Mr. Groundhog will give us some good news!Home When I'm With You

The Charlotte paper pack has three 12×12 sheets with different sized cards you can cut out and use for various things.  As you can see here, I used one as my focal point and sentiment.

Thank You Slanted

A quick and easy thank you card. You could probably whip this off in 10 minutes if you had to scramble for a card.  The sentiment could easily be swapped out for whatever you need.

Congrats

This one was fun.  The colours are so pretty.  I created my own patterned paper by stamping the flower on the coral striped paper.  I heat embossed the same flower on the sentiment card and coloured them using a blending pen and my inkpads.

Best Wishes Floral

I heat embossed the two black flowers on vellum, cut them out and stuck them on the little squares of paper using a brad.  I added the baker’s twine for interest but now that I look at this card again, I think had I turned it sideways I could have used the twine as a flower stem.  Funny what you see in a photo that you don’t necessarily see in real life.  Just gives you a different perspective, I guess!

Love to You & Yours

And last but not least, a love card that would be fitting for Valentine’s Day.  I might just send this to a friend!

BTW – all card layouts came from the CTMH Wishes book.

Hope you’re having a crafty day!

~Tracy


Show Some Love

Standard

Hi there!  I hope everyone had a fantastic holiday season. I can hardly believe it’s over for another year. What a whirlwind! Now it’s already mid-January and that means switching gears from Santa Claus and Christmas trees to cupids and hearts! My daughter and I have been busy cutting, colouring and gluing Valentine cards for her classmates and that inspired me to create a few of my own starting with this one…Treasured Friend

This card features the Close To My Heart January Stamp of the Month “Beloved Bouquet”. The pretty patterned paper is from the Charlotte paper pack.  Here’s another card I crafted with the same stuff…

Valentine rose

So happy to be back at it. I don’t realize how much I miss paper crafting until I sit back down at my desk and create something. Creativity is such a beautiful thing. There’s a New Year’s resolution – make more stuff this year!  What a great idea 🙂 and on that note I have one last card to share…


watercolour flower jar

Looks like water colours in the paper crafting world are back in style.  I dusted off my water colour pencils and tried my hand at these flowers.  I’m a bit rusty at it but it was fun none-the-less. A great excuse to have another go at it again soon! 🙂

~Tracy

Christmas Joy Cards

Standard

Hello there,

With the exception of maybe us papercrafters, it seems the act of sending Christmas cards is becoming a thing of days gone by. I don’t know about you but every year, I receive fewer Christmas cards than the year before. How sad is that? Maybe it’s the cost of postage or the simple fact that people are too busy to sit down and hand write a card to a friend or family member, but it really is nice to receive something in the mail other than a bill or junk mail don’t you think? I’m bound and determined to get mine made and sent out this year. Here is my first stab at this year’s pile of handmade Christmas cards.

Joy Cards

I was really interested in trying out the Cricut Craft Room and melding a few images together to create a focal point for my card. I decided to keep it simple and opted for the word joy with a Christmas ornament substituted in for the letter ‘o’.

Red Joy

What is better than a touch of silver or gold (or both) on a Christmas card?  I added the foil tape and heat embossed the snowflake on the ornament to make it pop.  The word joy is popped up with foam tape.

Green Joy

On this last card, I changed up the font and added pearl paint and glitter while the paint was still wet. This is not for the faint of heart.  I had glitter everywhere and was picking it off my face for two days afterwards!

Joy Sparkle

My apologies for the not-so-great photos.  I took these with my cell phone with no real light source. Gotta work on that!

Stay tuned for some easy and fun Christmas cards using the Close To My Heart October Stamp of the Month – Twinkle.

Happy card making!

~Tracy

A Season To Be Thankful

Standard

Hello fellow crafty people!  I hope you are enjoying the fall season wherever you are. This is my favourite time of year here in Canada and to help celebrate the season I made a few thank you cards.  These are always great to have on hand when you need to send off a note of gratitude to a friend, neighbour, colleague or teacher.

IMG_0809IMG_0806

IMG_0816IMG_0821

Don’t you just love the colours of fall? All those gorgeous shades of red, orange, brown and yellow with a touch of green and blue leftover from summer! Time to drink it all in and be thankful for the bounty before the cold winter weather sets in.

Speaking of bounty and being thankful, I would like to wish all my fellow Canadians a Happy Thanksgiving.  I hope you have a wonderful weekend full of family and friends.  And don’t forget to wear your stretchy pants to the dinner table!

~Tracy

Has It Really Been A Whole Year?

Standard

Hi everyone! I received a message from a lovely fellow blogger this morning who decided to check up on me because I haven’t posted to blogland in a whole year!!  I can’t believe it.  Life is busy with full-time work and family but it made me realize that I should still take some time out for the other love of my life – papercrafting!  I have done some crafty projects over the last little while.  Here is one I’d like to share…IMG_0763

This is a photo of my paternal grandparents on their wedding day – July 17, 1907.  I felt extremely lucky to get my hands on a copy of the photo and decided to make up a scrapbook page.  This will be the first page in an album of family photos.

I hope you all have been a little better at getting crafty than I have been about posting projects.  I’ll be back soon to share some interactive scrapbook pages from a trip to Arizona last March.  Stay tuned for that!

~Tracy

First Day of School

Standard

Hello there!  Is it really the end of summer?  The nights are cooler, the afternoon sun is casting longer shadows and we just finished our first week of school!  Sure signs that fall is coming fast.  I haven’t been posting much in the last year but I have been trying to fit in some crafting time.  This morning I finished a double scrapbook layout of my kids’ first day of school.  It feels good to get it down on paper for future enjoyment.  Here is page 1….

page 1The Close To My Heart Chalk It Up paper pack and matching Compliments chipboard embellishments made throwing these pages together a snap.  Here is page 2…

Page 2The sketch layout is from an old Close To My Heart Idea Book.

2 page layout

We actually went apple picking today – another sure sign of fall – so hopefully I’ll be back with some kind of project with pictures from the orchard.  Have a lovely day and thanks for looking!

~Tracy


Happy Easter!

Standard

Hi everyone!  Happy Easter to you all.  I hope you are enjoying a lovely weekend wherever you are.  Here in Ottawa, we’ve been experiencing colder than normal temps, but today the sun is shining, and the first flowers of spring are popping their green, sleepy heads up through the soil – a welcome sight!

After spending some time spring cleaning, I decided to venture into my poor, neglected craft room, and create something with a few new Close To My Heart products I accrued last month. LaughHere I’ve used one of the new CTMH embossing folders, papers from the Lollydoodle and Ariana paper packs, the Love This stamp set and the gorgeous Lagoon Zipper Lace.  The butterfly was heat embossed and coloured with Copic markers.

Well, this just got my juices flowing, so I decided to make some Easter treat bags.  Friends of ours invited us over for a turkey dinner tomorrow, and I thought it would be fun to create these little bags for the kids.Easter SweetsEach bag has a tag with the child’s initial on it.  I used CTMH Dream Pop paper because the colours are so vibrant and fun – just like the candy inside the bag.  My daughter and I had a blast creating these and filling them up!  I’m sure they will have a blast diving into them too!!

Until next time, happy crafting and Happy Easter!

~Tracy

Triple the Fun

Standard

Hello friends!  For this week’s challenge over at Heart2Heart, they want entries using 3 of something on your project – three stamps, three embellishments, or whatever you can come up with.  Here is a card utilizing the same focal image 3 times.Thanks a BunchThe flower image was stamped using the CTMH Hurray Bouquet stamp set.  For the centre of each flower, I used a tiny floral punch and some Teal Shimmer Trim to help jazz these flowers up a bit, and create dimension!  The paper is from the Balloon Ride paper pack.

Here are a couple of other cards that I intended to enter into some February challenges, but wasn’t able to post in time.Hello TweetyThis one was created for the ‘Shabby Chic’ challenge last week.  It showcases the Hello Tweety stamp set and some of the beautiful Frosted B&T papers.

And a Valentine card that didn’t quite make the ‘Hearts Galore’ challenge.

With All My Heart

Hope you’re having a great week.  Thanks for stopping by and see you next time!

~Tracy

Card Smorgasbord

Standard

Hello and welcome!  I had a really low key, crafty weekend, and it was terrific!  Sometimes you just gotta go with the flow, and if the flow is taking you on a wave of creativity, don’t fight it!  I have four cards to share and they are all very different.  First up is a card that uses the new CTMH Ariana paper pack, and the February Stamp of the Month – Wild About Love.Hey FoxyThis paper pack has a good mix of feminine and masculine patterns.  Perfect for a Valentine card!

The next card was made in the wee hours of the morning, when I was having trouble sleeping.  I kept it simple and used the CTMH Cloud Nine card making kit.  LOVE that teal shimmer tape!Just BecauseMy third card was inspired by a scrapbooking sketch  I found on Pinterest.  I liked the layout and decided to turn it into a card.Good TimesThe CTMH Jubilee papers work perfectly to give this card a summery, country feel.  I paired it with the Take Note stamp set, which comes in the Artbooking Cricut Bundle.  Makes me long for a summer picnic or a trip to the fairgrounds!

And for my last card, I give you the Unicorn….UnicornI bought this stamp set for my daughter.  She loves animals and mythological creatures, and when she saw this stamp set, she immediately fell in love.  This one’s for you Lauryn!

I hope you have a terrific week and find some crafty inspiration along the way.  See you soon!

~Tracy