Category Archives: Heat Embossing

Christmas Joy Cards

Standard

Hello there,

With the exception of maybe us papercrafters, it seems the act of sending Christmas cards is becoming a thing of days gone by. I don’t know about you but every year, I receive fewer Christmas cards than the year before. How sad is that? Maybe it’s the cost of postage or the simple fact that people are too busy to sit down and hand write a card to a friend or family member, but it really is nice to receive something in the mail other than a bill or junk mail don’t you think? I’m bound and determined to get mine made and sent out this year. Here is my first stab at this year’s pile of handmade Christmas cards.

Joy Cards

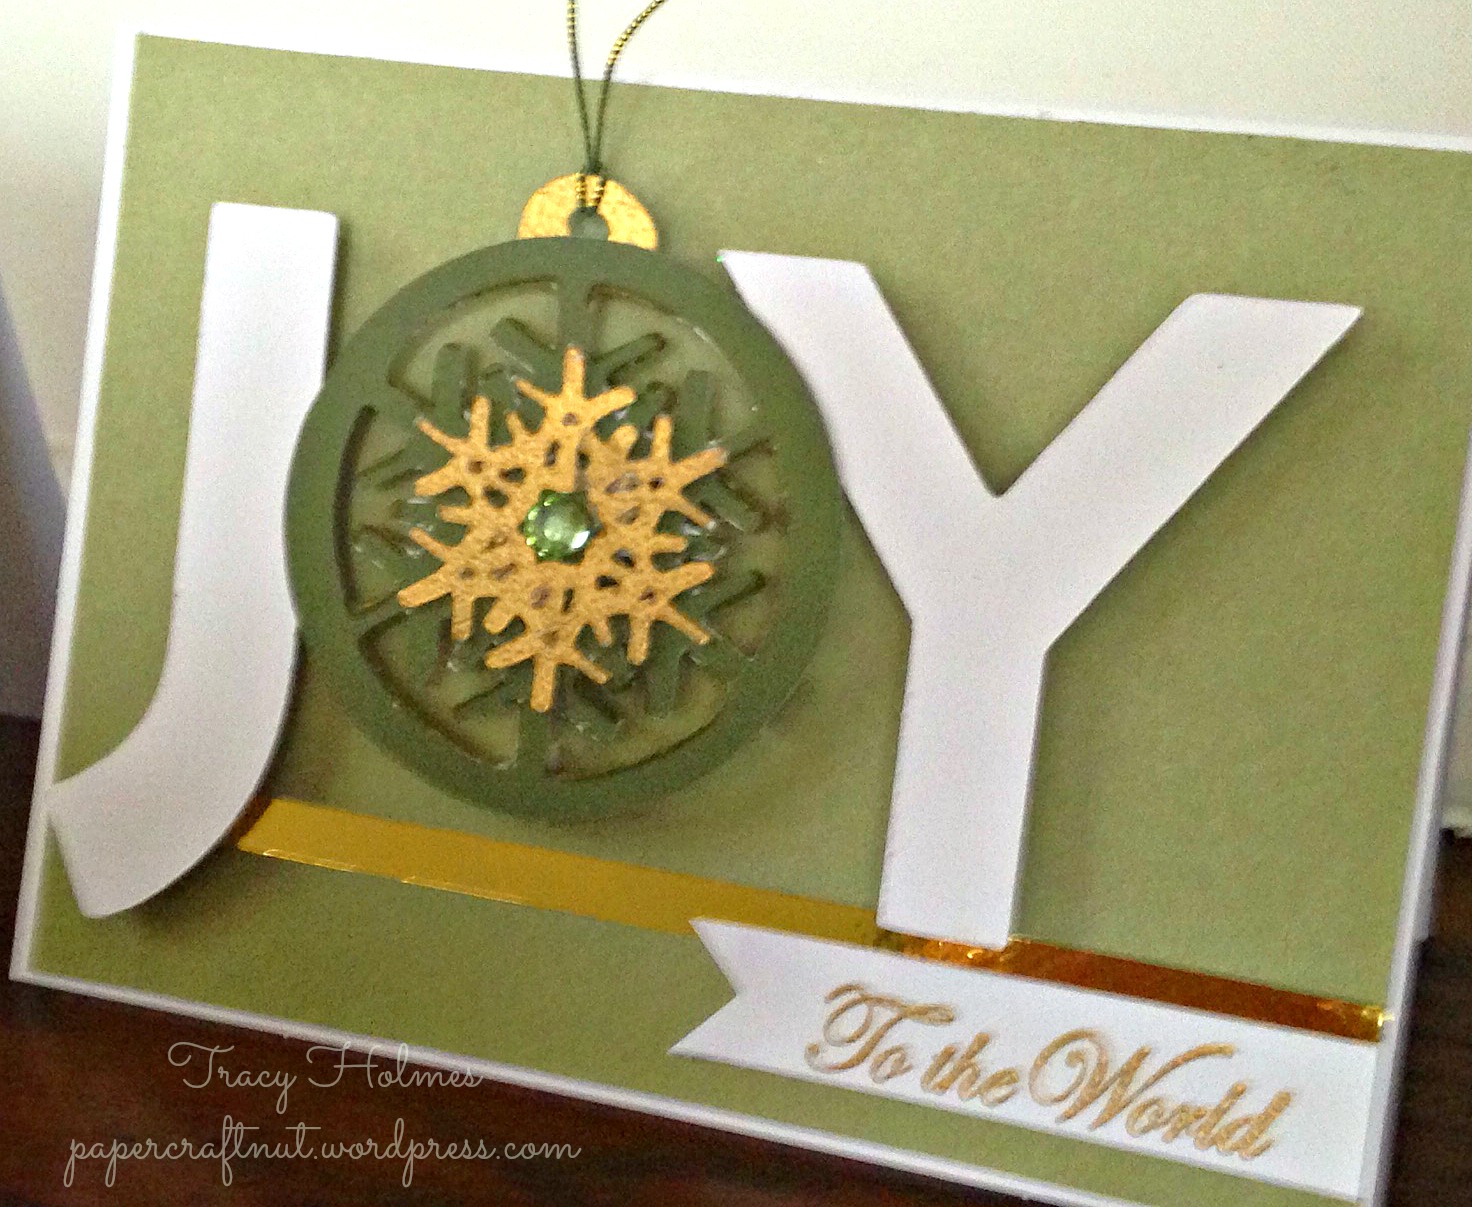
I was really interested in trying out the Cricut Craft Room and melding a few images together to create a focal point for my card. I decided to keep it simple and opted for the word joy with a Christmas ornament substituted in for the letter ‘o’.

Red Joy

What is better than a touch of silver or gold (or both) on a Christmas card?  I added the foil tape and heat embossed the snowflake on the ornament to make it pop.  The word joy is popped up with foam tape.

Green Joy

On this last card, I changed up the font and added pearl paint and glitter while the paint was still wet. This is not for the faint of heart.  I had glitter everywhere and was picking it off my face for two days afterwards!

Joy Sparkle

My apologies for the not-so-great photos.  I took these with my cell phone with no real light source. Gotta work on that!

Stay tuned for some easy and fun Christmas cards using the Close To My Heart October Stamp of the Month – Twinkle.

Happy card making!

~Tracy

Card Smorgasbord

Standard

Hello and welcome!  I had a really low key, crafty weekend, and it was terrific!  Sometimes you just gotta go with the flow, and if the flow is taking you on a wave of creativity, don’t fight it!  I have four cards to share and they are all very different.  First up is a card that uses the new CTMH Ariana paper pack, and the February Stamp of the Month – Wild About Love.Hey FoxyThis paper pack has a good mix of feminine and masculine patterns.  Perfect for a Valentine card!

The next card was made in the wee hours of the morning, when I was having trouble sleeping.  I kept it simple and used the CTMH Cloud Nine card making kit.  LOVE that teal shimmer tape!Just BecauseMy third card was inspired by a scrapbooking sketch  I found on Pinterest.  I liked the layout and decided to turn it into a card.Good TimesThe CTMH Jubilee papers work perfectly to give this card a summery, country feel.  I paired it with the Take Note stamp set, which comes in the Artbooking Cricut Bundle.  Makes me long for a summer picnic or a trip to the fairgrounds!

And for my last card, I give you the Unicorn….UnicornI bought this stamp set for my daughter.  She loves animals and mythological creatures, and when she saw this stamp set, she immediately fell in love.  This one’s for you Lauryn!

I hope you have a terrific week and find some crafty inspiration along the way.  See you soon!

~Tracy

Jewel In The Crown

Standard

Hi gang!  A quick post to share my Out of a Hat Creations challenge card.  The theme this week is ‘jewel in the crown’.  My take on this was inspired by the Make It Monday video over on the {capture the moment} blog.  If you want to see some great technique videos they have a new one every Monday – fabulous!Jewel in the CrownA bunch of different sized flags were cut using paper from the Gina K Designs Parisian Garden collection.  Once I had them glued down, I popped up a border on top and embellished it with the silver embossed crown and a banner that says Magnifique.  I also added splotches of silver spritz along with a few purple gems in the bottom corner.  C’est tout, as they say en francais.  Have a great day everyone!

~Tracy


Through Stormy Seas

Standard

Hello crafty friends.  This week at Out of a Hat Creations the challenge theme is travel/suitcase.  I just received my Tommy Workshop-On-The-Go Scrapbook Kit from Close To My Heart, and used it to create my challenge card.  I’m loving the stamp set that comes with this workshop and you can check it out by clicking the link.

Sail This ShipI stamped the sentiment onto the chipboard tag with Outdoor Denim pigment ink and heat embossed it with clear embossing powder.  I then sponged on some Bamboo ink to make it look weathered.  The map and sailboat were stamped and cut out to add a bit more weight to the tag.  I also stamped the blue star and the stitching around the perimeter of the card.Stormy SeasThe layout for this card was inspired by a card from the latest issue of Paper Crafts Magazine.  Such a great resource when you need some inspiration!

That’s it from me today.  Thanks for stopping by and have a crafty day!

~Tracy

Wonderful Fabulous You

Standard

Hi everyone!  I hope it’s not as cold in your neck of the woods as it is here.  We had unseasonably warm weather last week, but Old Man Winter is back with a vengeance!  Brrrrrrrr!  To warm things up a bit, the Heart2Heart Challenge Blog is hosting a hot cocoa inspired challenge this week.  I didn’t make a winter card but did use the colour cocoa quite a bit.Wonderful Fabulous YouI love this bird image and sentiment from the new Close To My Heart Fabulous You stamp set.  The diamond print down the side of the card is also a stamp from the same set.  It will be available beginning February 1st in the new CTMH Spring/Summer catalogue.Wonderful Fabulous YouThe Cocoa patterned paper is from the new Buzz and Bumble paper pack and I used the new brown Glitter Paper to frame out the focal image.  To add a pop of colour to the card, I ran a red ribbon down the side and sponged a bit of red onto the bird and flowers.

I have another card, which I will enter into last week’s challenge.  The theme was snow, so I made a snowman card for the occasion.There's Snowman Like YouHere I go again with the acetate!  I stamped and embossed the snowman onto a piece of acetate and then painted him with Color-Ready Pearl Paint.  This stuff is great because you can add reinker or distress stain to get whatever colour you want.  Once the paint was dry, I cut the acetate to size and used glue dots to adhere it to a clear card.  Unfortunately you can’t heat emboss right onto the clear card because they melt!  I found that out by trial and error!There's snowman like youThe inside of the card holds a piece of white card stock with the sentiment ‘There’s snowman like you’.  I ran it through the Cuttlebug with the Swiss Dots embossing folder to add a snowy look.  The stamps used on this card are both retired but they are so wintery and fun!

Hope you had a good time looking.  Have a great day and stay warm!

~Tracy

Hats Off To You

Standard

Hi all!  I have an Out of a Hat Challenge card to share with you today.  This week is a Bingo challenge, which is always fun.  I chose hat, button, heart, swirl.Hats off to you!I downloaded a picture of a tophat off the internet and imported it into Sure Cuts A Lot software.  I then used the image to create a cutting template for my Cricut.  The swirls were stamped on with Versamark and embossed in silver.Sentiment stripA strip of the new Close To My Heart Washi Tape was put down as a hat band, and a flag on top of that with the stamped sentiment.  I used Grey Wool ink to match the colour of the Washi tape.Hearts and buttonsA little heart and button vignette was created to adorn the hat band.  The netting underneath the button is from an orange bag, and adds a bit of texture and interest to the card.  I have started keeping these netting bags for just this sort of occasion.  Why not recycle and reuse when you can?Hats off to youThe silver ribbon on the button is wired, so I curled it around a paintbrush handle to create the curlicues.  I think I’ve covered all my bases for the Bingo challenge.  Head on over the Out of a Hat Challenge blog to see the other entries, if you have a few moments to browse.

Thanks for stopping by!

~Tracy

Shimmery Roses on Acetate

Standard

Happy humpday!  I’ve been messing around in my craft cave with acetate again.  This time I’ve used clear cards and one of the rose images from the Close To My Heart Happy Valentine’s Stamp of the Month Set.  This really is a gorgeous stamp set, and if you spend $50 on Close To My Heart products this month, you can get this set for $5!  A great deal.  Check out my CTMH Specials page for more details.Image

The whole process started off with me heat embossing the roses onto a piece of acetate.  Originally, I tried to do this right onto the clear card, but ended up melting it (dorky crafter mistake #1).  I also discovered, after the fact, that there is a protective plastic layer on each side of the clear card that needs to be peeled off before using (dorky crafter mistake #2).  I’ve used these clear cards before and wondered why they looked so cloudy.  Now I know, LOL!  Maybe the protective film contributed to the melting!Rose CloseupI wanted to add colour and sparkle to the roses, so I spread glue onto the roses with my glue pen, and then sprinkled them with Prisma Glitter.  This worked ok, but when I tried colouring the glitter with Copics – not so good!  After a few moments of contemplation, I decided to use my Color-Ready Pearl Paint, red reinker and green distress stain to colour them.  LOVE the results!RosesI added a drop of red reinker to a glop of pearl paint and mixed it up.  After painting in the roses, I went back in with straight reinker to add contrast.  Once that was finished, the same technique was used on the leaves using green distress stain and pearl paint.  This would have looked great without the Prisma Glitter, but the glitter adds a lovely shimmer.  The roses were cut out and stuck to the front of the card (paint and embossed side down) with glue dots.Thank YouThe inside of the card holds a piece of Colonial White card stock, which I stamped.  It was then run through the Cuttlebug with the Thanks embossing folder and adhered to the inside of the card with glue dots.  The roses were positioned on the front of the card to hide the Thank You sentiment inside.

I’m really happy with the way this turned out.  There is a snow themed challenge over at the Heart2Heart blog this week and  I may just have to try a snowflake card using this technique.  We’ll see what happens!  Have a fabulous evening and I’ll see you back here tomorrow for My Time Made Easy’s Pretty Palette Challenge #79.  Happy crafting!

50th Anniversary Card

Standard

Hi folks.  I’ve been thinking about entering into some new challenges to change things up a bit, so I made this anniversary card for the Addicted To Stamps Challenge.  I wanted to play along last week and actually started this card, but didn’t make the deadline, so I combined this week’s challenge (flowers) with last week’s bingo challenge.  For the bingo challenge I chose black, free and stripes.I used my Gina K Designs Lacey Borders stamp set for the lovely lace layers at the bottom of the card.  Keeping with the black and stripes, I added the tag from the Close To My Heart Perfect Fit – Frames stamp set and heat embossed the gold bit in the middle and around the outside edges.A strip of gold ribbon was added to the top of the lacey panels.  The flowers were stamped with Versamark and embossed with gold to match the tag.  Since the 50th wedding anniversary is gold, I thought it would be appropriate to add the gold elements.I came across a gold coloured gem pendant brad in my stash and added it to the tag.  I like how it hangs down into the lacey layers.  Clear gems were also added to the centre of each flower for more dimension and sparkle.  Gotta have bling!

So here goes nothin!  My first Addicted To Stamps challenge.  The design team over there is really talented, so check out what they have made if you get a chance.  You won’t be disappointed by the stunning projects you see.  Have a great day and happy crafting!

Birds of a Feather

Standard

Hi there!  The Out of a Hat Challenge this week is to create something to do with nature.  Now that’s a pretty broad subject, and there are many things to choose from, but I am in Christmas mode and wanted to make a bunch of Christmas gift tags.  So to incorporate the nature theme, I decided to make all my tags with birds on them.  I made six in total and plan to make more, but here is what I finished this weekend…I cut all the tags out with the CTMH Artiste Cricut Cartridge.  On this tag, I used one of the Pear & Partridge Complements Glittery Rub-Ons and heat embossed the Happy Holidays with gold embossing powder.On this tag, I used a strip of Burlap Ribbon around the middle and added a poinsettia brad.  The birds are at the top and are part of the stamped sentiment.My cardinal tag uses the To You and Yours stamp set and is coloured with the CTMH alcohol markers.  The beautiful woodgrain B&T paper is from the Dakota paper packet.This bird was cut with the Artiste cartridge and the edges inked with Cocoa ink.  The bird’s nest is made from a strip of the new CTMH Colonial White Rosette Ribbon.  I used Antique Linen DI to give it a bit of colour.  The edges of the tag were inked with a gold metallic pen and I heat embossed No Peeking in gold.Here is a super simple tag that is stamped using the rock n roll technique.  I added the gems for a bit of sparkle and inked the edges with Bamboo ink.And finally, a kraft tag with more of the Pear & Partridge Glittery Rub-Ons and a few red gems.  For these tags, I kept to a red, green and brown colour palette.  I think for my next round of tags, I might go with blues and greens; maybe some snowflakes and silver????  Not sure yet, but that’s part of the fun!

All in all, making gift tags for your Christmas presents is fun and easy, and really adds a personal touch.  Give it a try, and wow your friends and family this Christmas!  Have a great week, and we’ll see you back here real soon!  Happy crafting!

Winter Wishes

Standard

TGIF! Today a short post to show you my Heart 2 Heart Challenge card.  I will also enter this into the Paper Craft Planet Sketch Challenge SK102612.  This week we are to use all neutrals on a project – no other colours allowed!  I really enjoyed using a neutral palette and winter is the perfect theme for it.I chose to use kraft, brown and white, and created my own designer paper using the Countdown and Snow Flurries stamp sets.  After adhering that to the card base, I cut out the mittens from Chocolate card stock, using the Artiste Cricut Cartridge, and heat embossed the white bits onto them.I used a piece of the Color Ready Kraft border glued to a strip of Chocolate CS to break up my white background.  I then stamped Winter Wishes in Chocolate ink, from the To You and Yours stamp set.  And the last thing I added was the Chocolate Baker’s Twine and the clear gems.  Voila, a cute, neutral winter card.

Have a lovely weekend everyone!  Hope you find some time to make something.  Happy crafting!